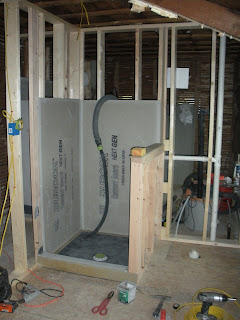
I'd forgotten that I hadn't done any updates for our second bathroom. For most of you, the last you've seen of it is this:
We've made some progress since then, in the form of insulation & vapor barrier,
 |
| mmm toasty |
drywalling,
 |
| late night drywalling as usual |
mudding and taping, painting, and finally...TILING!
Before we get to the tiling bit, a few words on the absolute horror of mudding/taping this bathroom: I've mentioned before how most renovators hate mudding and taping more than anything because it's messy (dusty) and tedious and repetitive, and I dislike it too, but can usually knock out a normal room in a few days. This bathroom took WEEKS because there are so many more corners (both inside and outside) than a normal room: we have that sloped ceiling, an alcove for the radiator, a bump out where the old wall used to be...it's kind of crazy. For reference, consider a normal box of a room; it has 8 inside corners and 0 outside corner...this bathroom has 19 inside corners and 7 outside corners. I dreaded it because -- again -- messy/tedious/repetitive, but also it's freezing up in the second floor with the heat turned off, and the end seemed never in sight. I finally sucked it up and finished it though, then sped through the painting so I could put up the lights (my favorite part!!!).
 |
| love these Kovak lights. We're going for a nautical vibe in this bathroom and I think these lights fit perfectly. |
Carpenter Dan installed some baseboards and then I started tiling on Wednesday.
I bought 70sqft of Vermont Slate in gray from Barre Tile and they also recommended this Schluter-ditra stuff for an underlayment. Tiling directly on top of plywood or OSB is generally not recommended, so you can get the fairly inexpensive and still perfectly suitable
backerboard stuff which you adhere to the plywood with mortar, screw in, tape over seams with mortar...basically it's labor intensive. Schluter-ditra on the other hand is expensive - like 1.90$/sqft (for UNDERLAYMENT) but the pros love it and it's easy to install (which is kinda important for a complete novice like me). I got the extra high ditra so that the in the end, the tile will be level with the hardwood at the doorway.
 |
| Wednesday: initial dryfitting. Yep, you can't mistake this BRIGHT ORANGE stuff for anything but ditra. |
 |
| Laticrete 253 GOLD was the mortar recommended by Barre Tile for securing ditra to the OSB floor |
 |
| here's my gloved hand mixing up the mortar with what is essentially a humongous electric whisk |
|
I let the ditra sit for a night and then tackled the tile. Our neighbors down the street, Jeff and Courtney, lent us their tile saw (yay).
I decided to install the 12x12 slate tile in a brick pattern + non-plumb walls + funny shape of room = a bit more work than the standard 12x12 tile install job, but it wasn't nearly as bad/hard as I thought it'd be. The wet tile saw is pretty much as miserable as I imagined, and my timing couldn't have been worse (highs in the single digits, lows in the negatives this past week) but I did it! It didn't turn out horrible!
 |
| Thursday evening: 3/5 done with tiling |
 |
| I used Laticrete 317 for thinset and a 1/4x1/4 notched trowel |
 |
| tile saw is LOUD |
 |
| Friday evening: DONE :D |
I'll wait a few days to let it really set before I clean it up and grout it. Pretty excited!


Holly Molly!
ReplyDeletemy dad says you guys could totally do this professionally, haha. we all can't wait to see more! :)
ReplyDelete